Production Metrology
The core task of production measurement and testing technology is the acquisition, characterization and function-oriented interpretation of geometrical deviations of industrially manufactured workpieces with a view to ensuring component quality by regulating the production process.
A current research focus is, for example, the research and further development of optical 3D coordinate measuring technology based on fringe projection sensors, which has a wide range of applications in the industrial environment due to its high resolution, measuring speed and flexibility. Specific research projects are currently concerned with researching an endoscopic fringe projection measuring system for measuring wear of forming tools as part of the development of sheet metal forming as a new type of manufacturing technology, as well as the extensive assessment of the condition of engine components under stress with a view to researching and developing suitable methods for component regeneration.
Another focus is the development and research of measurement and evaluation methods for optical 2D and 3D roughness measurement technology for the characterization of technical surfaces. For example, methods for the fusion of overlapping measurement fields and for the characteristic-based characterization of microstructured surfaces are currently being researched in various research projects based on measurement data sets recorded by means of chromatic-confocal sensor technology, confocal microscopy and white light interferometry.
Contact Person


Production Metrology
30823 Garbsen


Production Metrology
Production Metrology
-
Fast Inspection of Complex Geometries (SFB 871 C2)For the maintenance of an aircraft engine, particularly the inspection of the turbine blades of a blisk, the engines are partially disassembled and analyzed with flexible video endoscopes. This subjective visual inspection is carried out by specially trained staff. To enable a quantitative analysis of a blisk in addition to the personal assessment by the staff, research is being conducted on a high-precision miniature 3D measuring system based on the fringe projection method. This sensor is implemented via a borescope equipped with a chip-on-the-tip camera. In combination with highly accurate actuation and specially developed calibration and stitching processes, complete and automated 3D measurements are to be carried out. This system aims to enable precise quantitative quality control, thereby increasing the safety and efficiency of engine inspections.Led by: Prof. Dr. Eduard ReithmeierTeam:Year: 2011Funding: DFGDuration: 2011-2022
![]()
![]()
-
Multiscale Geometry Inspection (SFB 871 A2)The subproject A2 involves the development of a robot-guided multisensor system for the automated 3D capture of complex geometries. The measurement results of the individual scale ranges are used for the characterization of component geometry in terms of wear marks and damage, as well as for determining the surface condition by measuring the surface microstructures. The measuring system is used in the context of initial inspections and between processing repair measures for quality assessment.Led by: PD Dr.-Ing. Dipl.-Phys. Markus Kästner, Prof. Dr. Eduard ReithmeierTeam:Year: 2011Funding: DFGDuration: 2011-2022
![]()
![]()
-
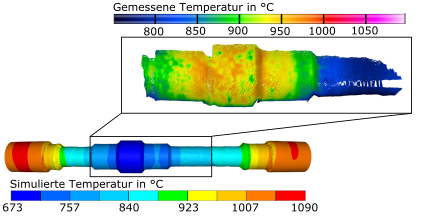
Multiscale Geometry Inspection of Joining Zones (SFB 1153 C5)The research focus of subproject C5 is the area-wide 3D geometry reconstruction of forging-heat Tailored Forming components using optical triangulation sensors. The inspection of the geometric features of the joining zone after each individual process step allows for the adjustment of the manufacturing process, early error detection, as well as the evaluation of component distortions that can arise from inhomogeneous cooling processes of hybrid material pairings. For further information: https://www.imr.uni-hannover.de/en/forschung/forschungsprojekte/forschungsprojekte-detailansicht/projects/multiskalige-geometriepruefung-sfb-1153-c5Led by: PD Dr.-Ing. Dipl.-Phys. Markus Kästner; Dr.-Ing. Lennart HinzTeam:Year: 2015Funding: DFGDuration: 2015-2027
![]()
![]()
-
Robust measurement data registration using machine learningIn the characterization of the microstructure of technical components, a conflict of objectives arises. A high resolution enables the capture of even small structures but results in a small measurement field. At the same time, the measurement field should be as large as possible to obtain statistically significant results. A solution is offered by registration, where multiple high-resolution images are assembled into an overall image. Classical methods often no longer meet today's requirements. Machine learning offers a promising approach to achieve more accurate and robust results. In the context of this project, these methods for registering microscopic surface measurement data are to be developed and researched.Led by: Prof. Dr. Eduard ReithmeierTeam:Year: 2019Duration: 01.02.2019-31.01.2024
![]()
![]()
-
Inline-Integrated Geometry Measurement System (Digit_Rubber)The aim of this sub-project is to establish and further develop an adapted measurement system for recording the 3D geometry in the rubber extrusion process. The measurement data will be analyzed for various parameters and shared with cooperative data-processing sub-projects. The motivation behind this initiative is to determine the cooling and die swell behavior for the material-specific characterization of rubber. Thus, the recorded data forms a digital building block for a deeper understanding of the material ‘rubber,’ as well as for potential process control measures, such as scrap reduction during ramp-up.Led by: PD Dr.-Ing. Dipl.-Phys. Markus KästnerTeam:Year: 2021Funding: Bundesministerium für Bildung und ForschungDuration: 01.05.2021-31.07.2024
![]()
![]()
-
Robot-assisted endoscopyWhen servicing aircraft engines, it is necessary to inspect not only the rotor stages, but also the fixed blades of the stator stages within the engine. A flexible video endoscope is currently used for this purpose. It is inserted into the gas duct through a small opening on the turbine side. In order to enable a quantitative analysis of damage geometries in addition to the personal assessment by speacialist workers, a flexible miniature 3D measuring system based on the fringe projection method is developed during this project. The project is carried out in collaboration with the IMES, wich deals with the development of a robotic carrier system based on a continuum robot.Led by: PD Dr.-Ing. Dipl.-Phys. Markus KästnerTeam:Year: 2023Duration: 2023 - 2026
![]()
![]()
-
3D endoscopy and damage detection in narrow installation spaces (SFB 871 T14)The aim of the transfer project T14 is the automated inspection of compressor blades in the engine. The process is currently carried out using flexible video endoscopes by a highly specialized employee who assesses the condition of the blades by means of a subjective visual inspection. For the automated inspection, a rigid endoscopic 3D measurement sensor is being developed that carries out 3D measurements of compressor blades in an aircraft engine based on fringe projection technology. The sensor is based on an industrial camera coupled to a rigid endoscope and an imaging fiber through which a pattern can be projected onto the measurement object. Furthermore, algorithms for segmenting and measuring defects are implemented in order to quantitatively assess the condition of a blade. This will improve the quality and process of engine inspections.Led by: PD Dr.-Ing. Dipl.-Phys. Markus Kästner, Prof. Dr. Eduard ReithmeierTeam:Year: 2023Funding: DFGDuration: 2023-2025
![]()
![]()
-
Referenced Large-Scale Airborne Measurement System - RAMS - SPP2433This project, which is part of the priority program "Flying Measurement Technology" SPP2433, deals with the measurement of large-volume components. The aim is to measure a 3D surface sensor along the surface of a large-volume object using a UAV and to obtain 3D data in high resolution and accuracy. The object is recorded with several individual measurements, making it possible to record the entire object with high precision if required. The individual poses of the sensor are captured by a laser measuring system located on the floor. The pose is used to reference the individual measurements. The measuring volume of the laser measuring system is extended with the help of autonomous robots by moving individual measuring stations.Led by: PD Dr.-Ing. Dipl.-Phys. Markus KästnerTeam:Year: 2024Funding: DFGDuration: Nov. 2024 - Nov. 2027
![]()
![]()
-
Cross-scale geometry inspection in mobile manufacturingThe increasing individualization in production is pushing conventional manufacturing methods to their limits. As part of the SCALE research projects, novel scalable and autonomous processes are being investigated. In particular, the mobile machining of components requires precise and, above all, flexible measuring systems to determine different geometric properties of the workpieces as well as their global position during the process steps. Conventional commercial measurement systems based on fringe projection profilometry are often limited in such scenarios by the restricted measurement volume and finite resolution to certain scales. The aim of this research project is to develop an innovative fringe projection profilometry system, where adaptation of the triangulation angle enables location- and scale-adapted measurement to address the multitude of measurement tasks.Led by: Dr.-Ing. Lennart Hinz; PD Dr.-Ing. Dipl.-Phys. Markus KästnerTeam:Year: 2024
![]()
![]()


