Production Metrology
-
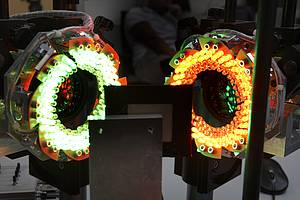
Fast Inspection of Complex Geometries (SFB 871 C2)For the maintenance of an aircraft engine, particularly the inspection of the turbine blades of a blisk, the engines are partially disassembled and analyzed with flexible video endoscopes. This subjective visual inspection is carried out by specially trained staff. To enable a quantitative analysis of a blisk in addition to the personal assessment by the staff, research is being conducted on a high-precision miniature 3D measuring system based on the fringe projection method. This sensor is implemented via a borescope equipped with a chip-on-the-tip camera. In combination with highly accurate actuation and specially developed calibration and stitching processes, complete and automated 3D measurements are to be carried out. This system aims to enable precise quantitative quality control, thereby increasing the safety and efficiency of engine inspections.Led by: Prof. Dr. Eduard ReithmeierTeam:Year: 2011Funding: DFGDuration: 2011-2022
![]()
![]()
-
Multiscale Geometry Inspection (SFB 871 A2)The subproject A2 involves the development of a robot-guided multisensor system for the automated 3D capture of complex geometries. The measurement results of the individual scale ranges are used for the characterization of component geometry in terms of wear marks and damage, as well as for determining the surface condition by measuring the surface microstructures. The measuring system is used in the context of initial inspections and between processing repair measures for quality assessment.Led by: PD Dr.-Ing. Dipl.-Phys. Markus Kästner, Prof. Dr. Eduard ReithmeierTeam:Year: 2011Funding: DFGDuration: 2011-2022
![]()
![]()
-
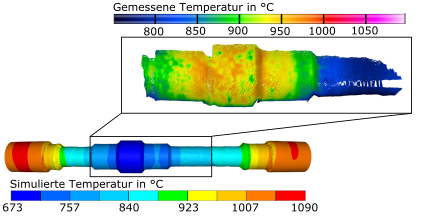
Multiscale Geometry Inspection of Joining Zones (SFB 1153 C5)The research focus of subproject C5 is the area-wide 3D geometry reconstruction of forging-heat Tailored Forming components using optical triangulation sensors. The inspection of the geometric features of the joining zone after each individual process step allows for the adjustment of the manufacturing process, early error detection, as well as the evaluation of component distortions that can arise from inhomogeneous cooling processes of hybrid material pairings. For further information: https://www.imr.uni-hannover.de/en/forschung/forschungsprojekte/forschungsprojekte-detailansicht/projects/multiskalige-geometriepruefung-sfb-1153-c5Led by: PD Dr.-Ing. Dipl.-Phys. Markus Kästner; Dr.-Ing. Lennart HinzTeam:Year: 2015Funding: DFGDuration: 2015-2027
![]()
![]()
-
Robust measurement data registration using machine learningIn the characterization of the microstructure of technical components, a conflict of objectives arises. A high resolution enables the capture of even small structures but results in a small measurement field. At the same time, the measurement field should be as large as possible to obtain statistically significant results. A solution is offered by registration, where multiple high-resolution images are assembled into an overall image. Classical methods often no longer meet today's requirements. Machine learning offers a promising approach to achieve more accurate and robust results. In the context of this project, these methods for registering microscopic surface measurement data are to be developed and researched.Led by: Prof. Dr. Eduard ReithmeierTeam:Year: 2019Duration: 01.02.2019-31.01.2024
![]()
![]()
-
Inline-Integrated Geometry Measurement System (Digit_Rubber)The aim of this sub-project is to establish and further develop an adapted measurement system for recording the 3D geometry in the rubber extrusion process. The measurement data will be analyzed for various parameters and shared with cooperative data-processing sub-projects. The motivation behind this initiative is to determine the cooling and die swell behavior for the material-specific characterization of rubber. Thus, the recorded data forms a digital building block for a deeper understanding of the material ‘rubber,’ as well as for potential process control measures, such as scrap reduction during ramp-up.Led by: PD Dr.-Ing. Dipl.-Phys. Markus KästnerTeam:Year: 2021Funding: Bundesministerium für Bildung und ForschungDuration: 01.05.2021-31.07.2024
![]()
![]()
-
Robot-assisted endoscopyWhen servicing aircraft engines, it is necessary to inspect not only the rotor stages, but also the fixed blades of the stator stages within the engine. A flexible video endoscope is currently used for this purpose. It is inserted into the gas duct through a small opening on the turbine side. In order to enable a quantitative analysis of damage geometries in addition to the personal assessment by speacialist workers, a flexible miniature 3D measuring system based on the fringe projection method is developed during this project. The project is carried out in collaboration with the IMES, wich deals with the development of a robotic carrier system based on a continuum robot.Led by: PD Dr.-Ing. Dipl.-Phys. Markus KästnerTeam:Year: 2023Duration: 2023 - 2026
![]()
![]()
-
3D endoscopy and damage detection in narrow installation spaces (SFB 871 T14)The aim of the transfer project T14 is the automated inspection of compressor blades in the engine. The process is currently carried out using flexible video endoscopes by a highly specialized employee who assesses the condition of the blades by means of a subjective visual inspection. For the automated inspection, a rigid endoscopic 3D measurement sensor is being developed that carries out 3D measurements of compressor blades in an aircraft engine based on fringe projection technology. The sensor is based on an industrial camera coupled to a rigid endoscope and an imaging fiber through which a pattern can be projected onto the measurement object. Furthermore, algorithms for segmenting and measuring defects are implemented in order to quantitatively assess the condition of a blade. This will improve the quality and process of engine inspections.Led by: PD Dr.-Ing. Dipl.-Phys. Markus Kästner, Prof. Dr. Eduard ReithmeierTeam:Year: 2023Funding: DFGDuration: 2023-2025
![]()
![]()
-
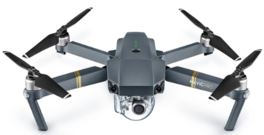
Referenced Large-Scale Airborne Measurement System - RAMS - SPP2433This project, which is part of the priority program "Flying Measurement Technology" SPP2433, deals with the measurement of large-volume components. The aim is to measure a 3D surface sensor along the surface of a large-volume object using a UAV and to obtain 3D data in high resolution and accuracy. The object is recorded with several individual measurements, making it possible to record the entire object with high precision if required. The individual poses of the sensor are captured by a laser measuring system located on the floor. The pose is used to reference the individual measurements. The measuring volume of the laser measuring system is extended with the help of autonomous robots by moving individual measuring stations.Led by: PD Dr.-Ing. Dipl.-Phys. Markus KästnerTeam:Year: 2024Funding: DFGDuration: Nov. 2024 - Nov. 2027
![]()
![]()
-
Cross-scale geometry inspection in mobile manufacturingThe increasing individualization in production is pushing conventional manufacturing methods to their limits. As part of the SCALE research projects, novel scalable and autonomous processes are being investigated. In particular, the mobile machining of components requires precise and, above all, flexible measuring systems to determine different geometric properties of the workpieces as well as their global position during the process steps. Conventional commercial measurement systems based on fringe projection profilometry are often limited in such scenarios by the restricted measurement volume and finite resolution to certain scales. The aim of this research project is to develop an innovative fringe projection profilometry system, where adaptation of the triangulation angle enables location- and scale-adapted measurement to address the multitude of measurement tasks.Led by: Dr.-Ing. Lennart Hinz; PD Dr.-Ing. Dipl.-Phys. Markus KästnerTeam:Year: 2024
![]()
![]()
Industrial and Medical Imaging
-
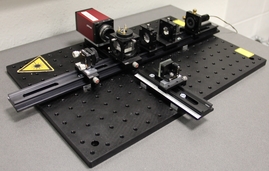
Model-based Automated Adjustment of Complex Optical SystemsThe use of optical systems is steadily increasing in both industry and among private users. For example, interferometers are used in metrology, lasers in gravitational physics, telescopes in astronomy, and camera lenses for imaging processes. With this growing demand, the requirements and complexity of such systems are also increasing. Particularly, the assembly process of miniaturized and complex optical systems is still predominantly performed manually today and thus significantly depends on the expertise of trained personnel.Led by: Dr.-Ing. Nils MelchertYear: 2020Duration: 01.04.2020 - 01.04.2023
![]()
![]()
-
Smart surgery through AI-based assistance systemsAs part of the research project, a digital OR assistant is to be developed, which will make it possible to relieve the staff in the OR by monitoring instruments and also to acquire data for planning more efficient and hygienically optimized ORs. Multiscale AI-based image processing for object recognition and coordinate regression will be central to the development of the OR assistant, which will make it possible to track relevant objects in the room with cost-effective and easy-to-install cameras and deliver robust results even in the event of occlusions. Central research questions include in particular network conditioning with synthetic data based on detailed virtual 3D environments and the development of network architectures in combination with state estimation methods. The recognition algorithm is used to monitor all tools in use and documents each individual tool in terms of duration of use, type of use, user and movement profile. All this information enables the creation of reliable statistics and the automated preparation of a surgical report, intelligent surgical planning or the design of gripper systems for automated instrument application. The project is funded by the Young Investigator Grands funding line of Leibniz Universität Hannover.Led by: Dr. Ing. Lennart HinzTeam:Year: 2024Funding: Young Investigator Grands LUHDuration: 01.01.2024 - 31.12.2025
![]()
![]()
-
Cross-scale geometry inspection in mobile manufacturingThe increasing individualization in production is pushing conventional manufacturing methods to their limits. As part of the SCALE research projects, novel scalable and autonomous processes are being investigated. In particular, the mobile machining of components requires precise and, above all, flexible measuring systems to determine different geometric properties of the workpieces as well as their global position during the process steps. Conventional commercial measurement systems based on fringe projection profilometry are often limited in such scenarios by the restricted measurement volume and finite resolution to certain scales. The aim of this research project is to develop an innovative fringe projection profilometry system, where adaptation of the triangulation angle enables location- and scale-adapted measurement to address the multitude of measurement tasks.Led by: Dr.-Ing. Lennart Hinz; PD Dr.-Ing. Dipl.-Phys. Markus KästnerTeam:Year: 2024
![]()
![]()
-
Einrichtassistenzsystem für Transferpressen auf KI-Basis (SPP 2422)The quality of formed components depends on various factors, including process temperature, material and machine properties, as well as tool settings. The initial setup and readjustment of multi-stage tools pose a challenge due to complex interactions, where trained personnel utilize implicit knowledge to stabilize process conditions and ensure the production of defect-free parts. The project aims to utilize AI-based methods to process process data in conjunction with domain-specific knowledge, enabling better modeling of implicit process relationships. This involves generating recommendations for setting up forming processes. In the first phase, experimental conditions are established to develop a multi-stage model for setting up forming processes. AI models identify inherent system interactions and predict geometric quality characteristics.Led by: Dr.-Ing. Lennart HinzTeam:Year: 2024Funding: DFGDuration: 2023-2026
![]()
![]()
Acoustics
-
Light weight IN-ear COmmunication headset with Active noise ReductionThe research project LINCOAR (Lightweight IN-ear COmmunication headset with Active Noise Reduction) is a commissioned research project by Sennheiser electronic GmbH & Co. KG, financially supported by the European Regional Development Fund and the state of Lower Saxony. It focuses on the development of in-ear headphones with active noise cancellation (ANC). At our institute, the research emphasis is on control design using adaptive algorithms. The project is divided into two sub-projects: adaptive feedforward control and adaptive feedback control. In the first sub-project, an adaptive feedback controller for active noise control in in-ear headphones is proposed. A major challenge with in-ear headphones is that the secondary path differs from person to person. By identifying the inverse minimum phase component of the path, the stability of the control loop is improved, enabling better attenuation. The effectiveness of this active adaptive system is confirmed through simulations and experimental results. In the second sub-project, several improvements related to adaptive feedforward control are introduced. In particular, the use of virtual sensors is explored. Remote microphone technology is employed to significantly enhance attenuation at the eardrum.Led by: Dr. Ing. Christian PapeYear: 2012
![]()
![]()
-
Position-adaptive rest zone in enclosed spacesIn environments with large transformers or rotating machinery such as aircraft engines, people are exposed to high and particularly continuous noise levels. The emitted sound, which is primarily low-frequency, cannot be sufficiently attenuated by wearing standard passive hearing protection. For instance, in aircraft cockpits, active measures are already in use to reduce engine noise at the pilot's seats using so-called "antinoise." However, available active solutions are either tied to fixed positions or require the carrying of corresponding portable devices (e.g., headphones). Within the scope of the current project, a feedforward control is being designed that automatically creates a local quiet zone at the desired position using antinoise. This involves the use of the virtual microphone method, with its effect position adaptively shifted using camera tracking. The achievable noise reduction at the location of the quiet zone largely depends on the parametric modeling of the sound propagation paths (the control paths), which can vary greatly locally. This is primarily caused by the use in enclosed spaces, whose acoustics, characterized by reflections, are reflected in the frequency response of the paths and make the identification of the paths a particular challenge.Led by: Dr.-Ing. Christian PapeTeam:Year: 2020
![]()
![]()
Control Engineering
-
Macro-micro kinematics for micro-assemblyThe focus of the research project lies in exploring methods for developing a handling system, which will serve as the actuator basis for a clinically suitable, ultra-precise mechatronic assistance system. The goal is to achieve a resolution of 1 µm in a working volume of 10 mm³, where the working volume can be flexibly positioned in space. The technical implementation is achieved by coupling piezoactuator technology with a 6-axis precision robot (µKRoS316). The robot is responsible for positioning the tools throughout the entire working area (macro positioning). The micro positioning unit takes on tasks such as compensating for the robot's positioning inaccuracies, counteracting vibrations, and precisely moving the tool. The work program can be divided into five areas according to the above-mentioned focus areas: Design of a coupled control Construction of an external measurement system for real-time 6D positioning Research on methods to improve the 6D positioning accuracy of positioning units Matching of the coordinate systems of positioning units and the measurement system and path planning Development and construction of the toolsetYear: 2015
![]()
![]()
-
Control concepts for image processing-supported movement of an objectAt the Institute for Measurement and Control Engineering, an experimental setup for stabilizing a 3D inverted pendulum was built. To determine the position of the pendulum, it is necessary to determine the positions of the pivot point and the tip of the pendulum. The position of the tip of the pendulum – specifically, the white ball – is determined with the help of a high-speed camera. The CMOS camera takes 148 frames per second. The relationship between the 2D image coordinates and the 3D world coordinates is established through a prior camera calibration. The position of the pivot point or the cart is determined via the stepper motors. The aim of the control is to keep the pendulum in a stable upright position at one location; in the second step, the pendulum should move stably on a path – specifically, on a circle. A PID controller, a state feedback controller, an MRAC (model reference adaptive control) controller with full state feedback, and a nonlinear controller are used. Technically, the control is implemented with the help of the xPC Target Toolboxes from MATLAB. The control algorithms are executed by the Target PC. On the Host PC, only the image processing is carried out, and the results are sent to the Target PC via the Ethernet connection. These control concepts could be used for stabilizing patients in radiation therapy.Year: 2015
![]()
![]()
-
Image feedback control of an optomechanical derotator for measurements on rotating componentsRotating components are installed in a wide variety of machines. To ensure efficient and safe operation, checking these is essential. This can be most reliably achieved through measurements, especially if these are carried out non-contact and during actual operation. This way, it can be ensured that the results are not falsified by the measuring system.Led by: Dr. Ing. Christian PapeTeam:Year: 2017
![]()
![]()
-
Simultaneous Localization and Mapping System using Aerial CameraIn the areas of robot navigation, localization and mapping, as well as augmented or virtual reality, the demand for real-time 3D reconstruction methods has increased significantly in recent years. A promising approach to implementing 3D reconstruction methods is the principle of Simultaneous Localization and Mapping, known as SLAM. The goal of this method is, on the one hand, the 3D reconstruction of the environment, and on the other hand, the relative localization and tracking of moving objects.Led by: Dr.-Ing. Christian PapeTeam:Year: 2018Duration: 01.01.2018 – 31.12.2020
![]()
![]()
-
Robot-assisted assembly of optical systems using predictor-corrector methodsThis research project focuses on the functional construction of optical systems and aims to reduce the high required tolerances of both the optical components and the positioning systems. Furthermore, it also aims to ensure a lower rejection rate of optical components during the manufacturing process.Led by: Dr.-Ing Christian PapeTeam:Year: 2018
![]()
![]()
